Installation manual for our users
- Visit www.my.soliseco.com
- Sign up and create your account
- You will be able to benefit from all the features to simplify your installations as much as possible.
Android Smartphone
To install the Soliseco app:
- Open the internet browser (preferably Chrome)
- Visit the site www.my.soliseco.com
- You can install the app by clicking on the icons (green) listed below
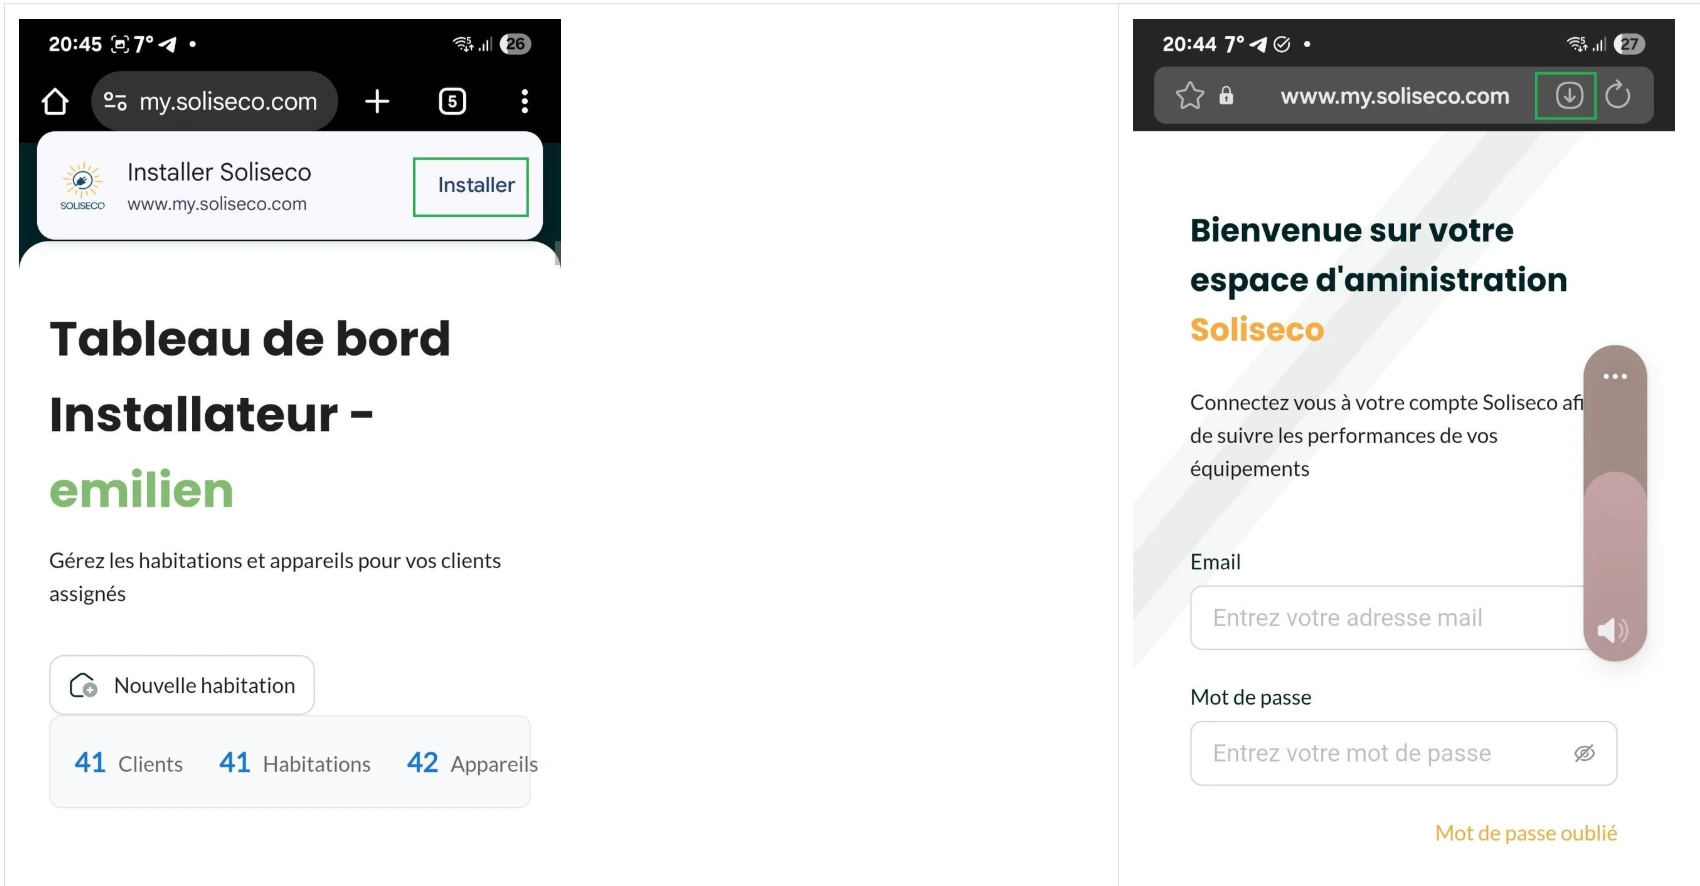
- If the phone does not offer to install the app, click on the 3 small dots in the top right and install it manually.
Apple iPhone / Macbook
To install the Soliseco app:
- Open the internet browser (Safari)
- Visit the site www.my.soliseco.com
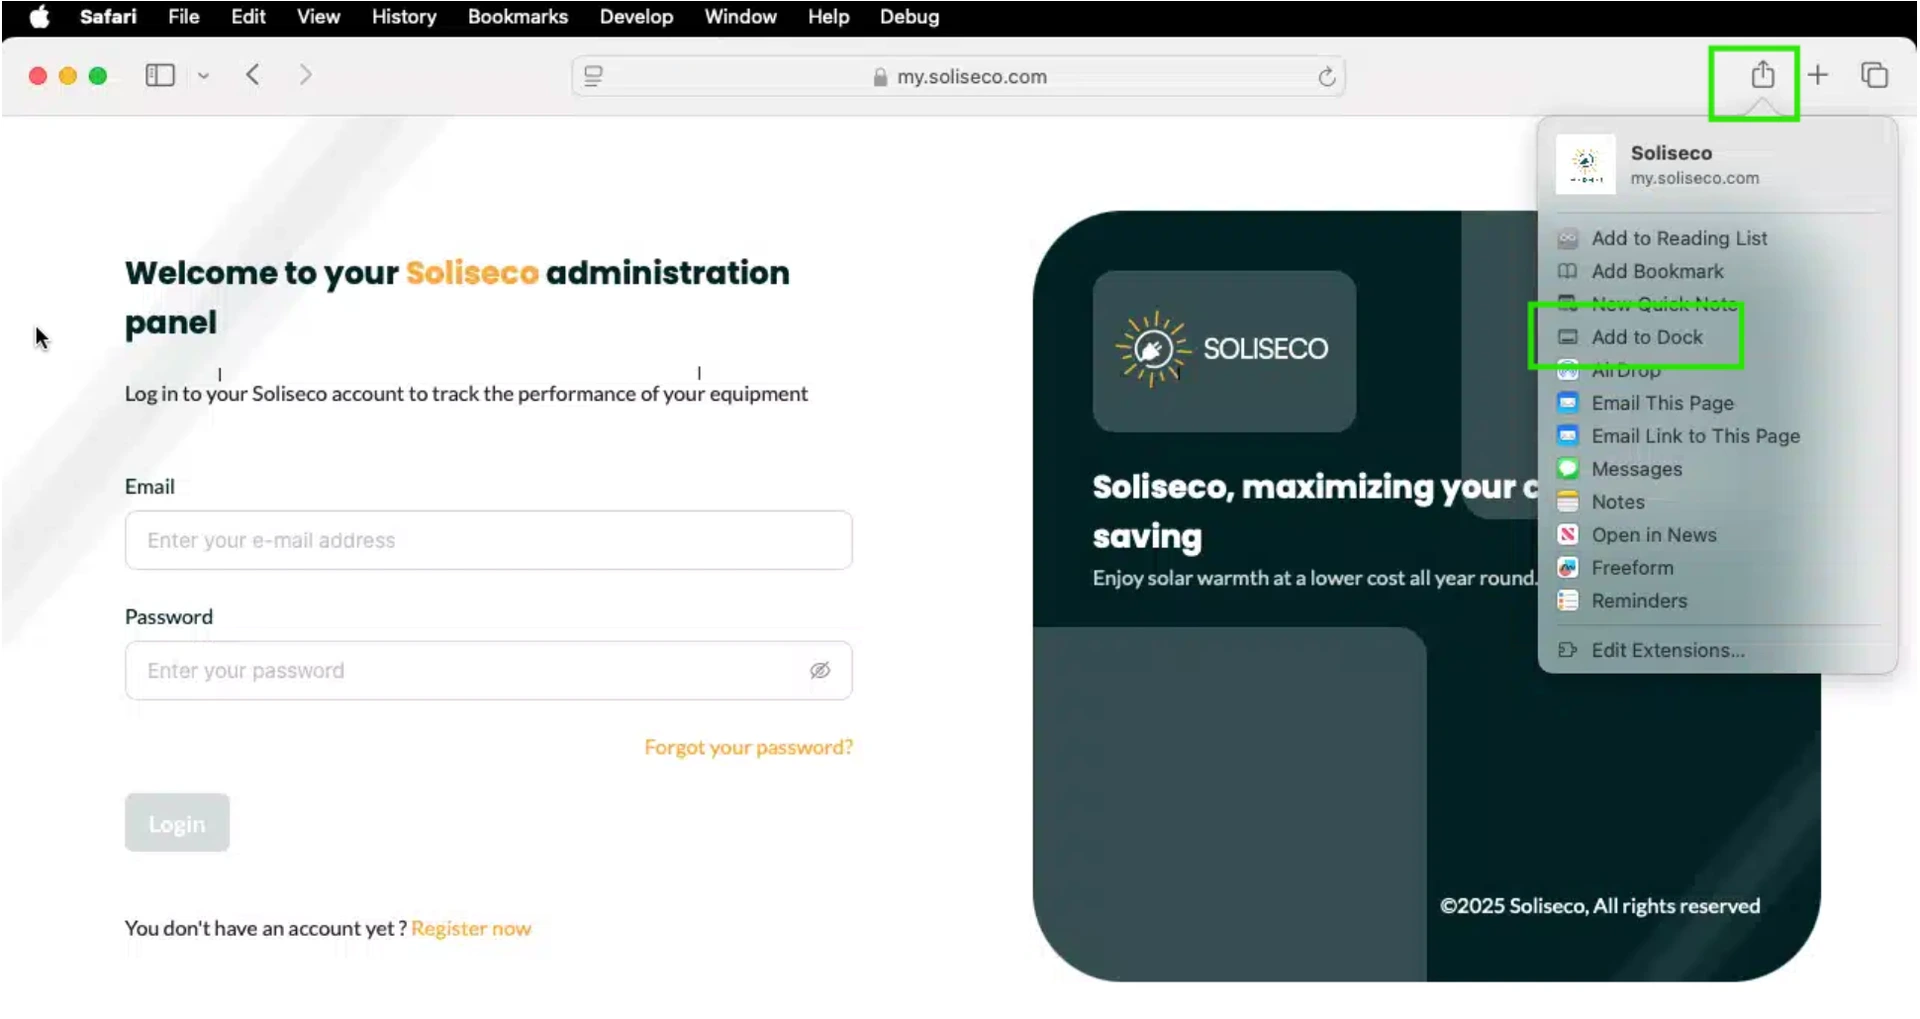
- You can install the app by clicking on the share icon (green)
- On Macbook: click on "Add to Dock"
- On iPhone: Click on "Add to Home Screen"
Computer / Laptop
To install the Soliseco app:
- Open the internet browser (preferably Chrome)
- Visit the site www.my.soliseco.com
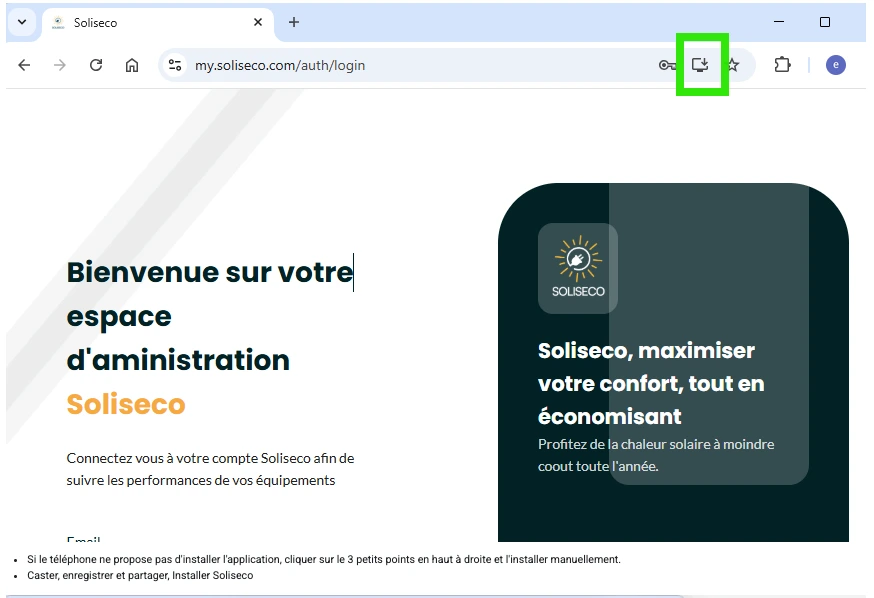
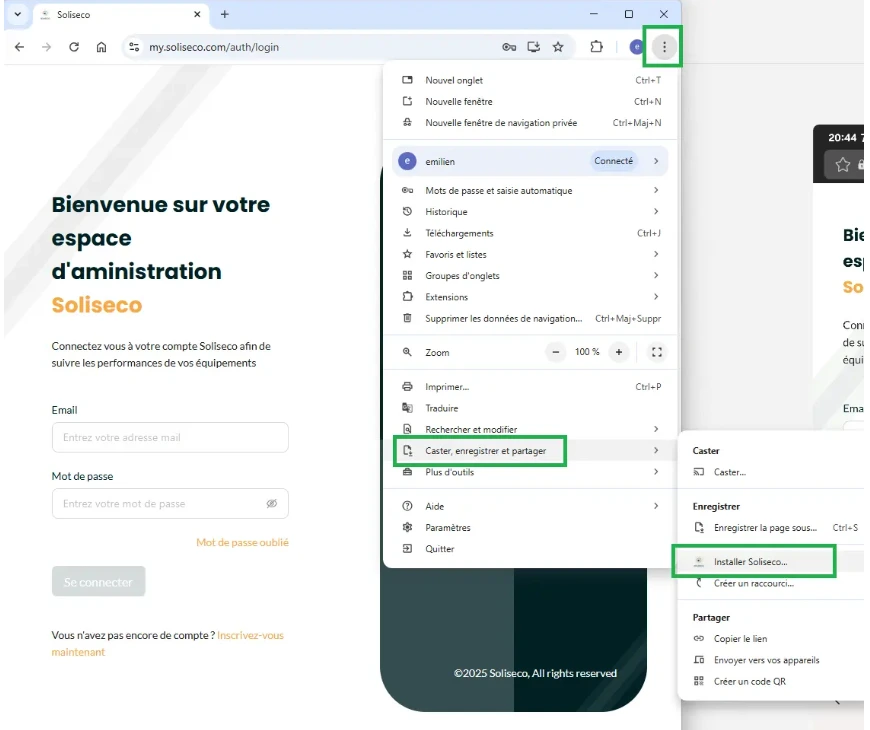
- You can install the app by clicking on the icons (green) listed below
P1 port reader / Soliseco dongle
- Plug the Soliseco dongle into the P1 port of the smart meter and wait until the WiFi LED is blue (=Soliseco dongle ready to connect to WiFi)
- Search in the Wi-Fi for the one that starts with Soliseco (from this moment no more internet connection)
- Open a web page and connect to http://192.168.4.1/
Choose the home Wi-Fi and enter the password:
- The screen shows “Success” and the Wi-Fi LED is solid green: PERFECT: The Soliseco device is connected to the Wi-Fi.
- The screen shows “Failed” or the Wi-Fi LED remains blue: ERROR: The device failed to connect to the Wi-Fi (Password error?), you need to start again from step 2.
- The screen shows “Success” and the Wi-Fi LED is blinking green: The P1 port is probably not open. It is necessary to contact the network manager to open the P1 port of the communicating meter.
P1 port reader Homewizard
- Place the Homewizard dongle in the P1 port of the communicating meter
- Install the Homewizard app on your smartphone
- If already connected: disconnect from the account you are connected to
- Create a new account with the client's email address
- Create a home
- Enter the client's name
- Add a device "P1 Meter"
- Follow the connection procedure on the Wi-Fi
- Check in the device configuration settings that the API is enabled
Connection to the Wi-Fi via the Soliseco app
A small Wizard will guide you through the steps to connect the Soliseco device to the Wi-Fi:
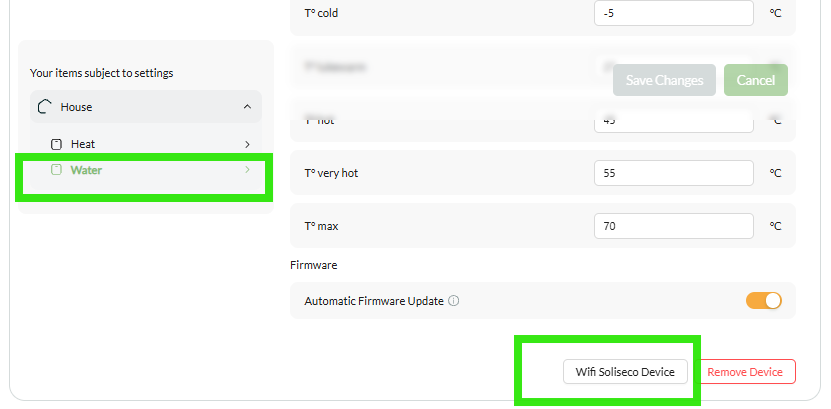
A small Wizard will guide you through the steps to connect the P1 port reader to the Wi-Fi:

Manual connection to Wifi
1) Plug in the Soliseco box and wait until the wifi LED blinks slowly (=Soliseco cannot find the home wifi)
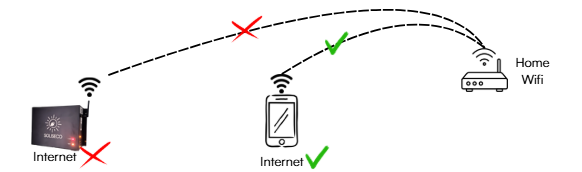
2) Press the wifi LED for 5 seconds and wait until it blinks quickly (= Soliseco ready to connect to the home wifi).
3) Connect to the Wifi that starts with Soliseco (from this moment no internet connection)
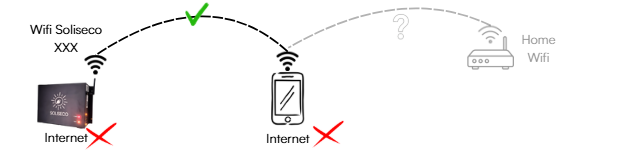
4) Open a web page and connect to http://192.168.4.1
5) Choose the home Wifi and enter the password
6A) The screen indicates “Success” and the Wifi LED is continuously on: PERFECT: The Soliseco box is connected to the Wifi.
6B) The screen indicates “Failed” or the Wifi LED blinks slowly: ERROR: The box failed to connect to the Wifi (Password error?), you need to start again from step 2
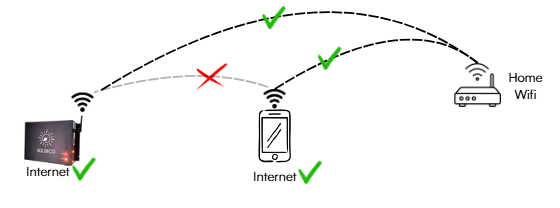
If you cannot connect Soliseco to the Wifi / port reader P1:
- If you are using a repeater / Wifi amplifier, check if the setup is possible from the router / internet box. Sometimes the connection is more complicated when using a repeater or Wifi amplifier.
- Check that the Wifi connection is sufficient at the location of the Soliseco box / port reader P1
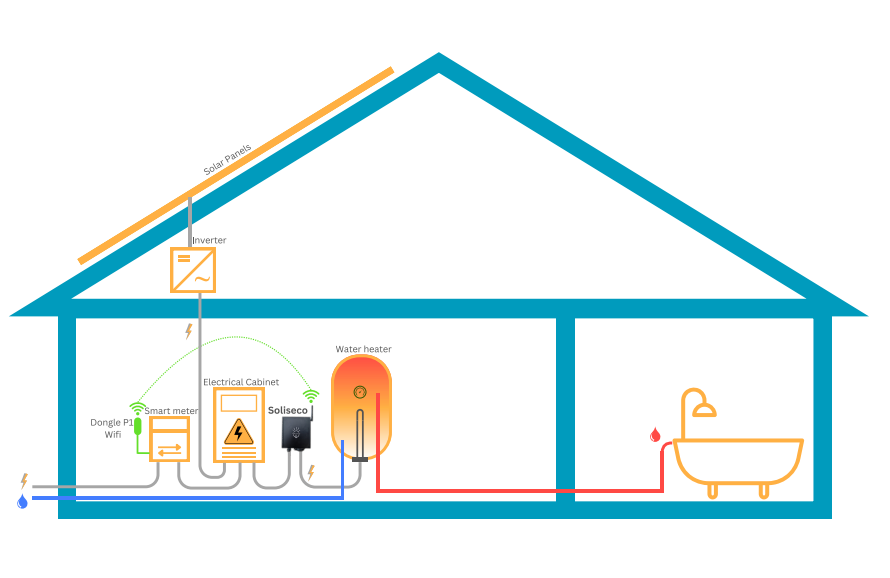
The dongle is installed on port P1 of the communicating meter
- The Soliseco regulation box is installed near the water heater and powers it
- Soliseco boxes and dongle are connected to the same Wifi
Electrical connection
- Restore power to the supply / circuit breaker
- Plug Soliseco into the outlet
Connect the hot water tank to the Soliseco box after:
- filling the tank with water
- connecting the box to the wifi
- configuring Soliseco
Create a Soliseco account for the client
- Connect your smartphone or computer to the Wifi network where Soliseco will be installed
- Connect to www.my.soliseco.com
- Log in with your installer client account
- Go to the User Management section
- Create a new user
Assign them the role of:
- "Basic User": They will only see certain settings, will be limited in configuration
- "Advanced User": so they can make all the adjustments they want
- Return to the home section
Press the "New Home" button
- Choose which client to create this home for
- Give it a name as well as the address fields
- In this new home, press the button to add a new device
- Add the device ID and give it a name
- Press the "Next" button
Connect Soliseco to Wifi
- Press and hold the wifi button on the right side for 5 seconds and release
- The LED lights on the side blink quickly to indicate the box is ready to be added to the Wifi
- Open the available Wifi networks
- Choose a Wifi network that starts with "Soliseco" and connect
It is possible to have an alert message indicating that there is no network, accept the connection despite the message.
During this connection, the Soliseco device emits a Wifi signal so that you can choose which Wifi network to connect to.
- Open an internet browser and connect to the Page http://192.168.4.1/
- Choose the Wifi network to which the Soliseco device should connect
- Enter the password
Wait a few seconds:
- If Fail: restart the procedure from the beginning
- If Success: the device is now connected to the wifi and you are redirected to the local page of the Soliseco device
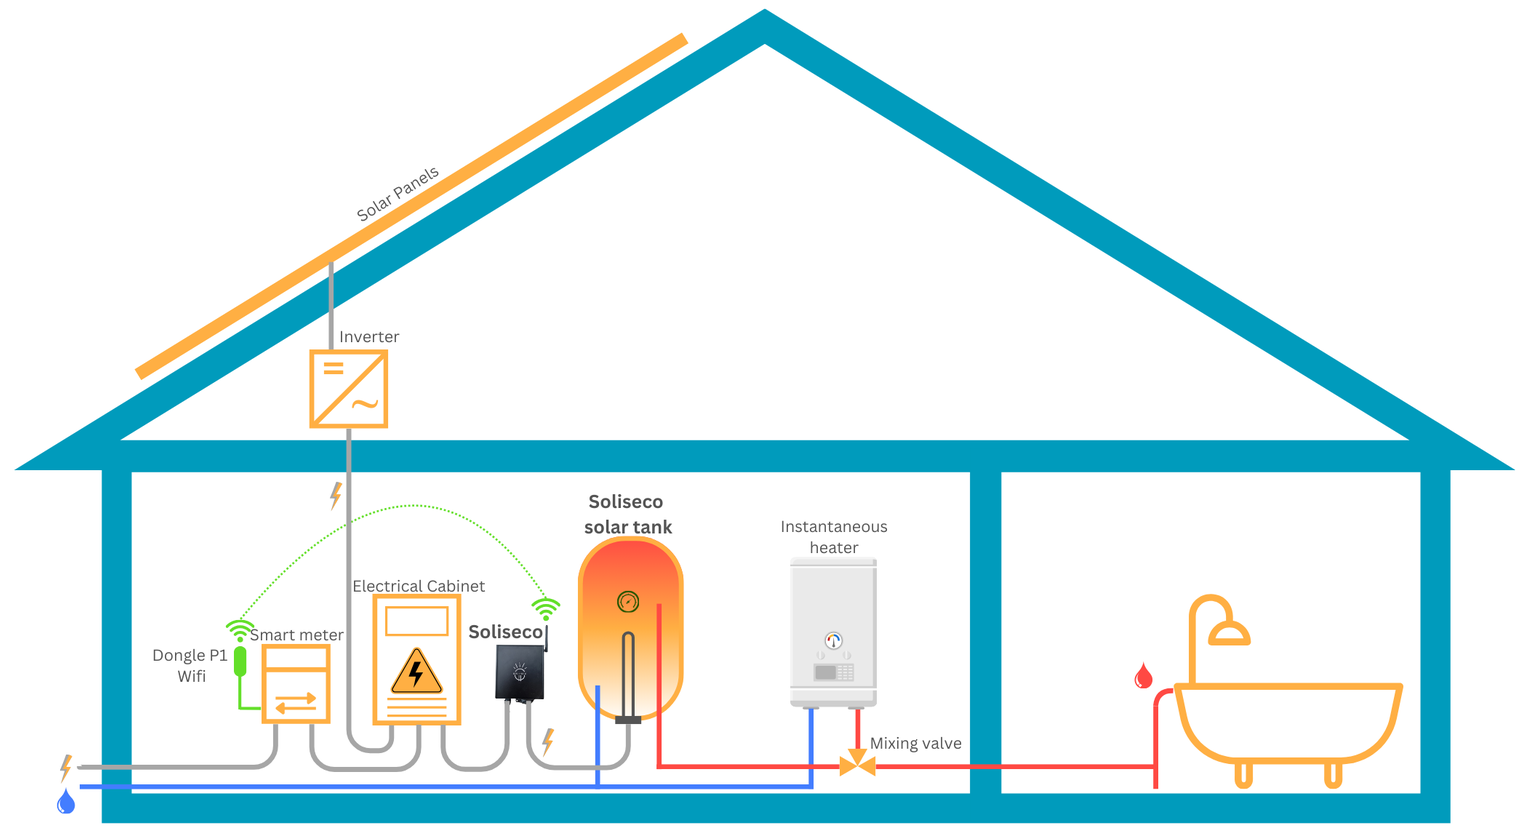
The dongle is installed on port P1 of the communicating meter
- The electric water heater is installed as close to the boiler as possible
- The Soliseco regulation box is installed near the water heater and powers it
- The mixing valve system is installed as close to the boiler as possible
- Soliseco boxes and dongle are connected to the same Wifi
Filling the system with water
- Fill the tank with water
- Check that it is securely fixed to the wall during filling
- Check that there are no leaks before the tank is completely filled
- During filling, open a tap to release the air
- Turn the boiler back on
- Purge the air present and check that hot water flows well (be careful with the position of the 3-way valve which may need to be moved manually to release the air)
Electrical connection
- Restore power to the supply / circuit breaker
- Plug Soliseco into the outlet
Connect the hot water tank to the Soliseco box after:
- filling the tank with water
- connecting the box to the wifi
- configuring Soliseco
Create a Soliseco account for the client
- Connect your smartphone or computer to the Wifi network where Soliseco will be installed
- Connect to www.my.soliseco.com
- Log in with your installer client account
- Go to the User Management section
- Create a new user
Assign them the role of:
- "Basic User": They will only see certain settings, will be limited in configuration
- "Advanced User": so they can make all the adjustments they want
- Return to the home section
Press the "New Home" button
- Choose which client to create this home for
- Give it a name as well as the address fields
- In this new home, press the button to add a new device
- Add the device ID and give it a name
- Press the "Next" button
Connect Soliseco to Wifi
- Press and hold the wifi button on the right side for 5 seconds and release
- The LED lights on the side blink quickly to indicate the box is ready to be added to the Wifi
- Open the available Wifi networks
- Choose a Wifi network that starts with "Soliseco" and connect
It is possible to have an alert message indicating that there is no network, accept the connection despite the message.
During this connection, the Soliseco device emits a Wifi signal so that you can choose which Wifi network to connect to.
- Open an internet browser and connect to the Page http://192.168.4.1/
- Choose the Wifi network to which the Soliseco device should connect
- Enter the password
Wait a few seconds:
- If Fail: restart the procedure from the beginning
- If Success: the device is now connected to the wifi and you are redirected to the local page of the Soliseco device
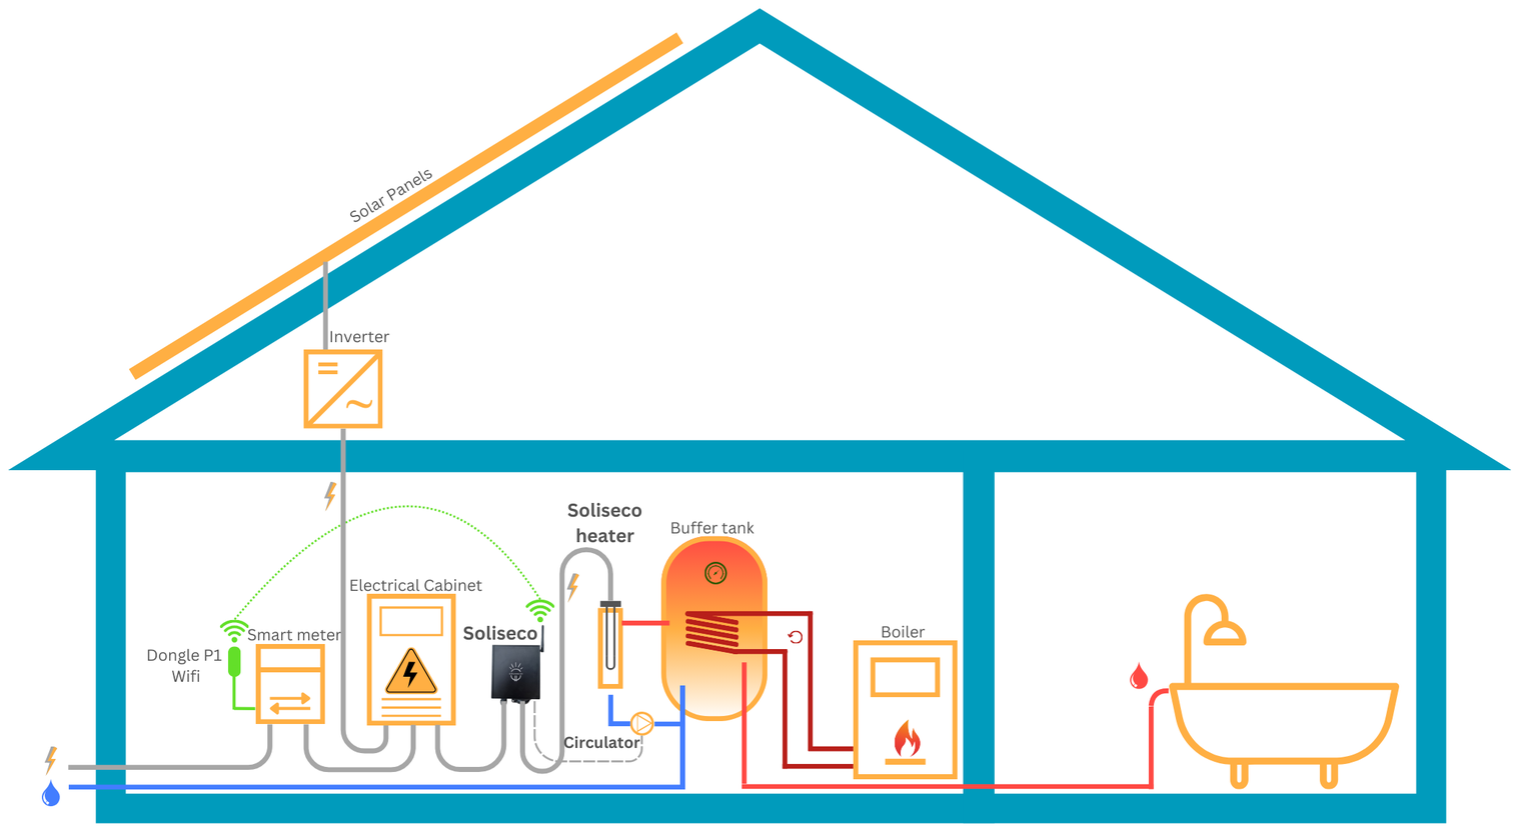
The dongle is installed on port P1 of the communicating meter
- The inline heater is installed as close as possible to the existing hot water tank
- The Soliseco control box is installed near the inline heater and powers it
- The Soliseco box and dongle are connected to the same Wifi
Filling the system with water
- Close the isolation valves of the inline heater
- Fill the tank with water
- Check that there are no leaks before the tank is completely filled
- During filling, open a tap to release the air
- Turn the boiler back on
- Purge the present air and check that hot water flows well
- Put the inline heater under water
- Purge the air
- Check that there are no leaks
- Press the boost button (without the immersion heater being connected to Soliseco) to force the start of the circulator. Check that the water flows well in it.
Electrical connection
- Restore power to the supply / circuit breaker
- Plug Soliseco into the outlet
Connect the inline heater to the Soliseco box after:
- the filling of the tank and the heater
- connecting the box to the wifi
- configuring Soliseco
Create a Soliseco account for the client
- Connect your smartphone or computer to the Wifi network where Soliseco will be installed
- Connect to https://www.my.soliseco.com/
- Log in with your installer client account
- Go to the User Management section
- Create a new user
Assign them the role of:
- "Basic User": They will only see certain settings, will be limited in configuration
- "Advanced User": so they can make all the adjustments they want
- Return to the home section
Press the "New Home" button
- Choose which client to create this home for
- Give it a name as well as the address fields
- In this new home, press the button to add a new device
- Add the device ID and give it a name
- Press the "Next" button
Connect Soliseco to Wifi
- Press and hold the wifi button on the right side for 5 seconds and release
- The LED lights on the side blink quickly to indicate the box is ready to be added to the Wifi
- Open the available Wifi networks
- Choose a Wifi network that starts with "Soliseco" and connect
It is possible to have an alert message indicating that there is no network, accept the connection despite the message.
During this connection, the Soliseco device emits a Wifi signal so that you can choose which Wifi network to connect to.
- Open an internet browser and connect to the Page http://192.168.4.1/
- Choose the Wifi network to which the Soliseco device should connect
- Enter the password
Wait a few seconds:
- If Fail: restart the procedure from the beginning
- If Success: the device is now connected to the wifi and you are redirected to the local page of the Soliseco device
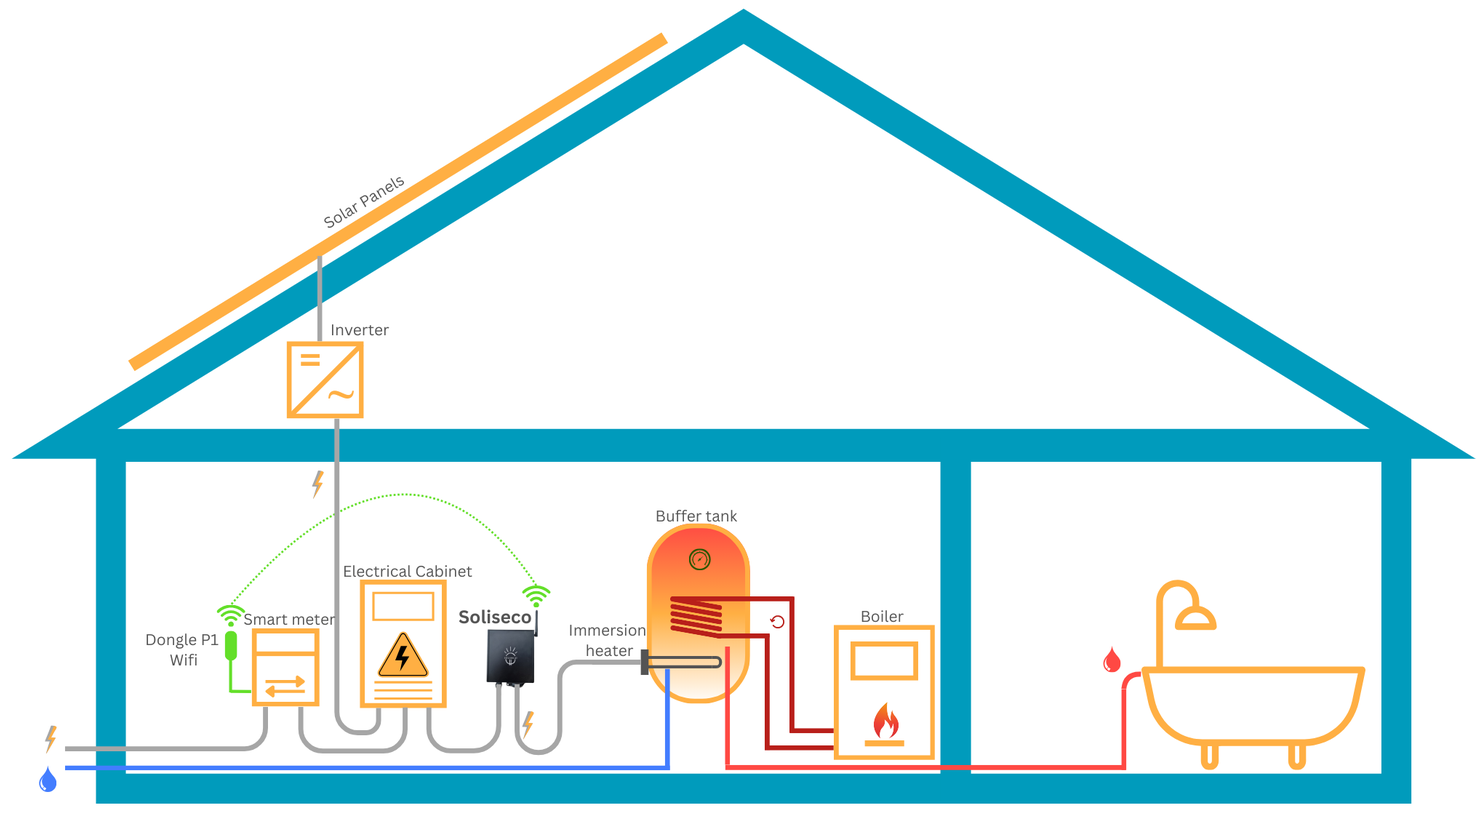
The dongle is installed on port P1 of the communicating meter
- The Soliseco control box is installed near the immersion heater and powers it
- Soliseco box and dongle are connected to the same Wifi
Filling the system with water
- Fill the tank with water
- Check that there are no leaks before the tank is completely filled
- During filling, open a tap to release the air
- Turn the boiler back on
- Purge the present air and check that hot water flows well
- Wait before connecting the immersion heater (see electrical connection)
Electrical connection
- Restore power to the supply / circuit breaker
- Plug Soliseco into the outlet
Connect the hot water tank to the Soliseco box after:
- filling the tank with water
- connecting the box to the wifi
- configuring Soliseco
Create a Soliseco account for the client
- Connect your smartphone or computer to the Wifi network where Soliseco will be installed
- Connect to www.my.soliseco.com
- Log in with your installer client account
- Go to the User Management section
- Create a new user
Assign them the role of:
- "Basic User": They will only see certain settings, will be limited in configuration
- "Advanced User": so they can make all the adjustments they want
- Return to the home section
Press the "New Home" button
- Choose which client to create this home for
- Give it a name as well as the address fields
- In this new home, press the button to add a new device
- Add the device ID and give it a name
- Press the "Next" button
Connect Soliseco to Wifi
- Press and hold the wifi button on the right side for 5 seconds and release
- The LED lights on the side blink quickly to indicate the box is ready to be added to the Wifi
- Open the available Wifi networks
- Choose a Wifi network that starts with "Soliseco" and connect
It is possible to have an alert message indicating that there is no network, accept the connection despite the message.
During this connection, the Soliseco device emits a Wifi signal so that you can choose which Wifi network to connect to.
- Open an internet browser and connect to the Page http://192.168.4.1/
- Choose the Wifi network to which the Soliseco device should connect
- Enter the password
Wait a few seconds:
- If Fail: restart the procedure from the beginning
- If Success: the device is now connected to the wifi and you are redirected to the local page of the Soliseco device
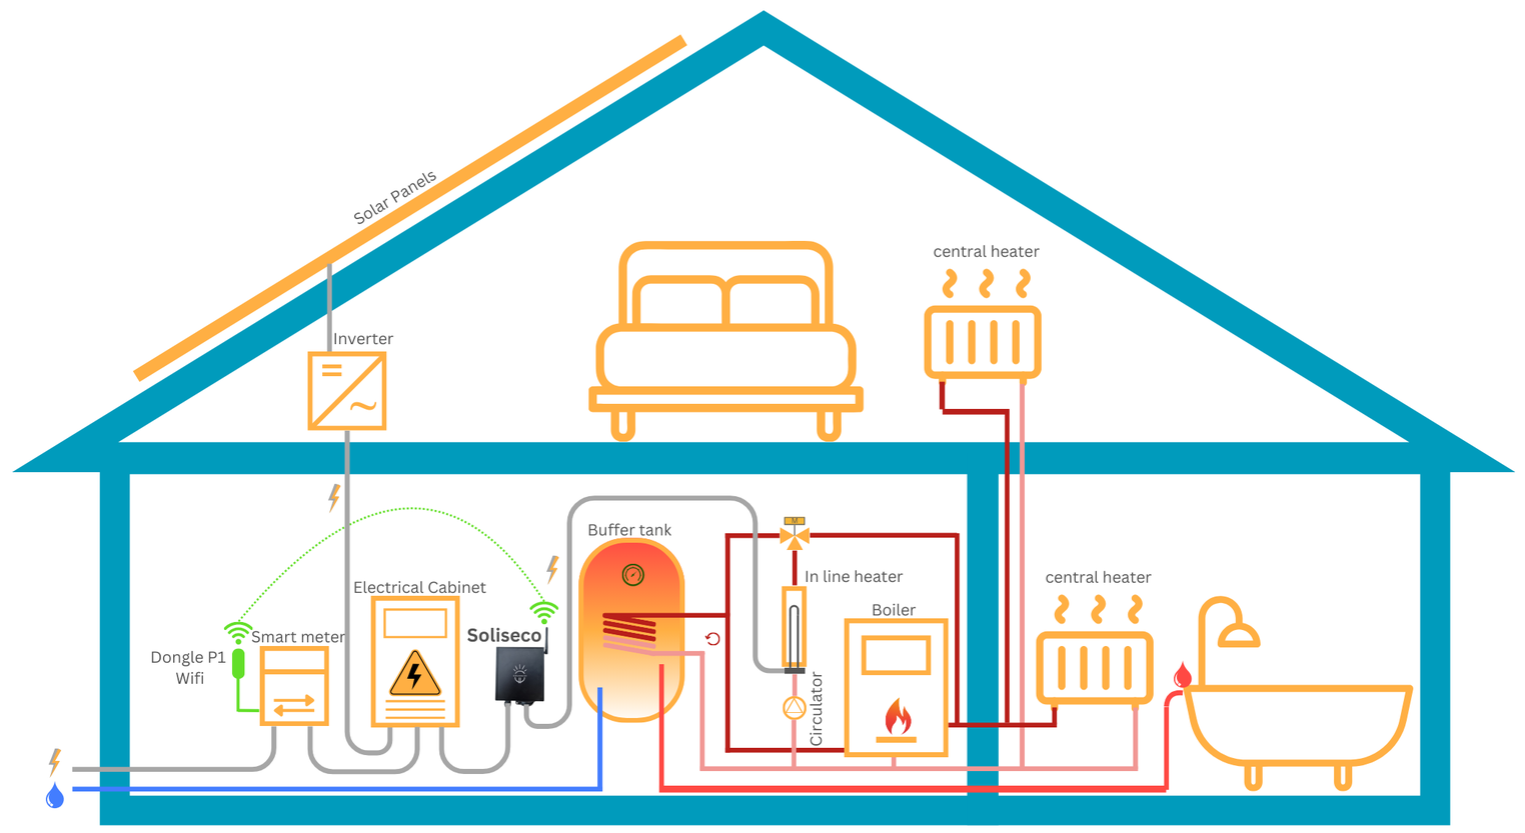
The dongle is installed on port P1 of the communicating meter
- The inline heater is installed as close as possible to the existing hot water tank
- The Soliseco control box is installed near the inline heater and powers it
- The mixing valve system is installed as close to the boiler as possible
- The 3-way valve is installed at the outlet of the inline heater
- The Soliseco box and dongle are connected to the same Wifi
Filling the system with water
- Close the isolation valves of the inline heater
- Turn on the heating system
- Check that there are no leaks before the circuit is completely filled
- During filling, purge to evacuate the air
- Turn the boiler back on
- Purge the present air and check that the hot water circulates well
- Put the inline heater under water
- Check that there are no leaks
- Press the boost button (without the immersion heater being connected to Soliseco) to force the start of the circulator. Check that the water flows well in it.
Electrical connection
- Restore power to the supply / circuit breaker
- Plug Soliseco into the outlet
Connect the inline heater to the Soliseco box after:
- the filling of the tank and the heater
- connecting the box to the wifi
- configuring Soliseco
Create a Soliseco account for the client
- Connect your smartphone or computer to the Wifi network where Soliseco will be installed
- Connect to www.my.soliseco.com
- Log in with your installer client account
- Go to the User Management section
- Create a new user
Assign them the role of:
- "Basic User": They will only see certain settings, will be limited in configuration
- "Advanced User": so they can make all the adjustments they want
- Return to the home section
Press the "New Home" button
- Choose which client to create this home for
- Give it a name as well as the address fields
- In this new home, press the button to add a new device
- Add the device ID and give it a name
- Press the "Next" button
Connect Soliseco to Wifi
- Press and hold the wifi button on the right side for 5 seconds and release
- The LED lights on the side blink quickly to indicate the box is ready to be added to the Wifi
- Open the available Wifi networks
- Choose a Wifi network that starts with "Soliseco" and connect
It is possible to have an alert message indicating that there is no network, accept the connection despite the message.
During this connection, the Soliseco device emits a Wifi signal so that you can choose which Wifi network to connect to.
- Open an internet browser and connect to the Page http://192.168.4.1/
- Choose the Wifi network to which the Soliseco device should connect
- Enter the password
Wait a few seconds:
- If Fail: restart the procedure from the beginning
- If Success: the device is now connected to the wifi and you are redirected to the local page of the Soliseco device
The local Soliseco API allows you to control certain functions of the system directly on the local network. It is particularly useful for integrating Soliseco with an EMS, a home automation system, n8n, Home Assistant, Node-RED, or any other system capable of making HTTP requests.
Prerequisites
To use the API, you need to know the local IP address of the Soliseco box.
In the examples below, this address is represented by :
<ip>
The API also uses an access token :
soliseco
The base address is therefore :
http://<ip>/api/v1/
Change the operating mode
The mode change is done via an HTTP POST request to :
http://<ip>/api/v1/mode?token=soliseco
The desired mode must be sent in the body of the request in JSON format.
Sleep Mode
{"mode":"sleep"}
Example in PowerShell :
Invoke-RestMethod -Method POST -Uri "http://<ip>/api/v1/mode?token=soliseco" -ContentType "application/json" -Body '{"mode":"sleep"}'
Normal Mode
{"mode":"normal"}
Example :
Invoke-RestMethod -Method POST -Uri "http://<ip>/api/v1/mode?token=soliseco" -ContentType "application/json" -Body '{"mode":"normal"}'
Boost Mode
{"mode":"boost"}
Example :
Invoke-RestMethod -Method POST -Uri "http://<ip>/api/v1/mode?token=soliseco" -ContentType "application/json" -Body '{"mode":"boost"}'
Check the system status
The system status can be queried via the endpoint :
http://<ip>/api/v1/status?token=soliseco
The request is also made in POST.
Example :
Invoke-RestMethod -Method POST -Uri "http://<ip>/api/v1/status?token=soliseco" -ContentType "application/json"
The response allows you to retrieve the available status information via the local API.
Integration into an EMS or home automation system
To integrate Soliseco into an external system, simply replicate the same HTTP request.
To change mode :
Method : POST
URL : http://<ip>/api/v1/mode?token=soliseco
Content-Type : application/json
Body : {"mode":"sleep"}, {"mode":"normal"} or {"mode":"boost"}
An EMS can thus automatically adjust the operating mode of Soliseco based on photovoltaic production, consumption, a pricing signal, or any other energy logic.
Example in n8n
In a node HTTP Request :
Method
POST
URL
http://<ip>/api/v1/mode?token=soliseco
Content Type
JSON
Body
{
  "mode": "normal"
}
The value of the mode can of course be dynamic and come from another node in the workflow.
Can we simply use the URL in a browser?
No, not to change mode with the current API.
When you enter a URL in a browser's address bar, it generally makes a request GET.
However, the Soliseco API expects a request here POST accompanied by a JSON body.
Therefore, simply entering :
http://<ip>/api/v1/mode?token=soliseco&mode=sleep
in a browser does not reproduce the request expected by the API.
You need to use a system capable of sending an HTTP POST request, such as PowerShell, n8n, Home Assistant, Node-RED, Postman, or a compatible EMS.
Note regarding curl in PowerShell
Using curl.exe with JSON in Windows PowerShell can sometimes generate formatting errors related to quotes.
An error of type :
invalid_json_payload
may appear even if the URL is correct.
For testing on Windows, we therefore recommend using Invoke-RestMethod.
Example :
Invoke-RestMethod -Method POST -Uri "http://<ip>/api/v1/mode?token=soliseco" -ContentType "application/json" -Body '{"mode":"normal"}'
Security
The local API is intended to be used on the local network.
It is not recommended to expose the Soliseco box directly to the Internet via port forwarding.
For remote access, it is better to use a secure solution such as a VPN or a dedicated gateway.
Summary
Change mode
Endpoint :
POST http://<ip>/api/v1/mode?token=soliseco
Available modes :
{"mode":"sleep"}
{"mode":"normal"}
{"mode":"boost"}
Read status
Endpoint :
POST http://<ip>/api/v1/status?token=soliseco
The local Soliseco API thus allows for simple integration with the main home automation systems and energy management platforms.